Followers

Friday, June 28, 2013

GIRLY

Welcome!!  I'm so happy you came to visit today. I am designer of the day on the Card A Day Blog where our theme of the week is "TEEN."  My card was such fun to make, but a challenge as well because I was not only making a card for an age group I'm not that familiar with any more, but I was also making this card for one of our challenges at the Crafter's Digital Art Club, Easy As 1-2-3.  In addition to a digital image, the challenge required the use of one sentiment, two design papers and three embellishments.  Here is your first look:


I first chose the two dps to give me a color basis.  These two pieces, as well as the cut ovals, were from my scraps.  I must confess, however, that my card base and the mat were both cut new.  I just didn't have the right colors in the scrap stack.

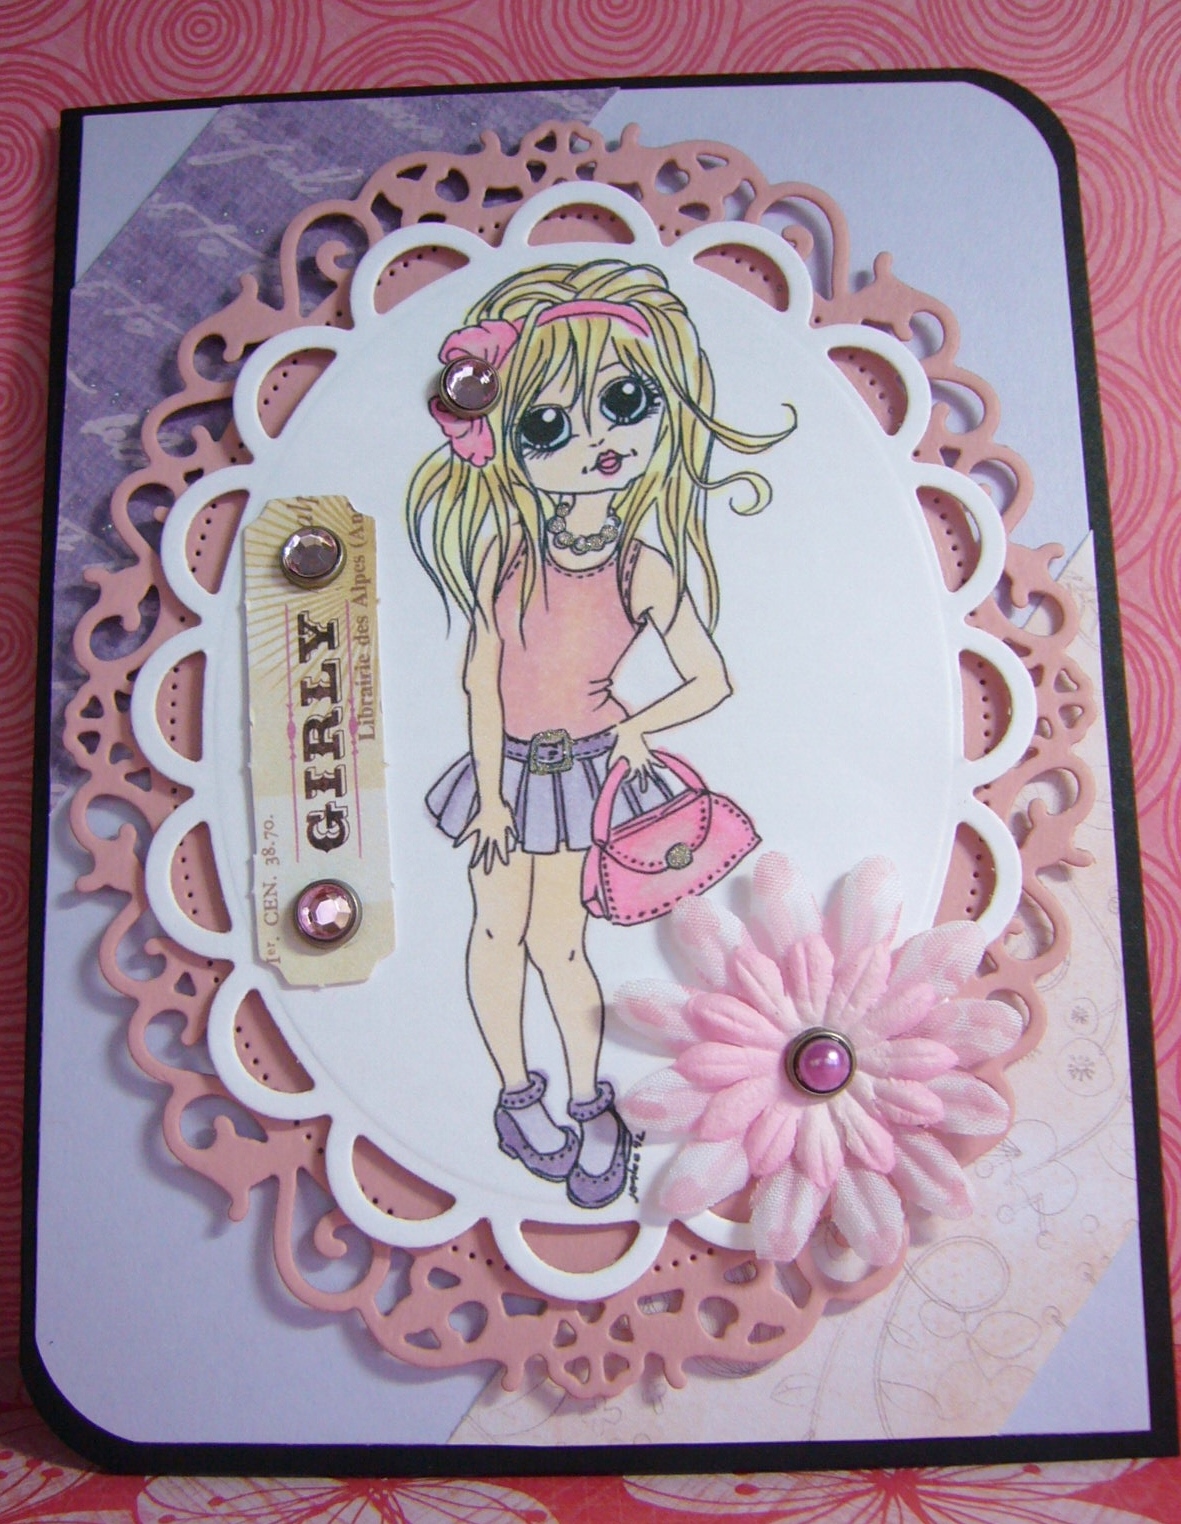
Once I had the papers chosen I selected the embellishments.  Then I went about finding the right colors from my collection of Copics to color my image.  I just love this image.  She is called "Uptown Cutie" and she comes from Jen Leeflang at DigiStamps4Joy.


I colored the image, and then used a die to cut it out.  I also die cut a fancy frame for her.  I added a bit of glam to her outfit with a glitter pen, and used sparkly brads for some extra glitz.


The brads were used to attach my little sentiment tag as well as sparkle up my cutie's bow.  The last addition was the flower which I attached using a pearly brad as the center.


I used foam tape to affix the two oval layers so that my card would have lots of dimension, but still remain flat enough to fit easily into an envelope.


Here are some of the details:
          Papers:  Recollections (black and lilac)
          Flower:  Petaloo and The Paper Studio
          Brads and Sentiment Tag:  My Mind's Eye "Lost & Found" collection
          Glitter Pen:  Sakura Gelly Roll "Clear Star"
          Copics:  V20, V25, RV11, RV13, R00, BG01, Y00, E000, E31
          Dies:  Spellbinders Nestabilities Lacey Ovals and Floral Ovals

See you again soon!!!


Big HUGS,
CHRISTINE

Tuesday, June 18, 2013

It's an Inspiration!

Well, hello again!  I'm trying to get caught up with our challenges over at the Crafter's Digital Arts Center.  We have just under two weeks left on our current challenges; they are all ending on June 30.  If you love working with digital art you should come on over and check us out.  The challenge I have designed my current card for is the "Inspiration" Challenge.  Thus, the title of my post.  I used a pretty image from Tiffany Doodles to design my card around.  Here is the inspiration from the challenge:


I used my usual A2 sized base for the card.  I chose three coordinating dps, and created my own sentiment for both outside and inside.
 
 
Once I determined where I wanted to position each dp, I did all the cutting.  This included cutting a backing piece to frame the image.
 
 
I lightly colored the image with Copics, and mounted it to its backing.  I diecut the outside sentiment, and colored the outer portion of the tag as well.  Two matching brads attached the tag to the background.  I used foam tape to affix the image piece.
 
 
To finish my card I simply printed the inside sentiment onto white card to give a light space for a handwritten message and signature.
 
 
This card would have been fairly quick to put together, but I tend to get picky sometimes which causes many of my projects to take much longer to make than they should.  (hehe)  Anyway, I'm pleased with how my card turned out; I think I did a pretty good job using the inspiration colors. What do YOU think?
 
See you again as soon as I can!!!
 
Big HUGS!
CHRISTINE

Monday, June 17, 2013

Just Because You're You

Greetings to all you lovely ladies and gents out there!  My challenge this week at the Card A Day Blog was to make a card for the theme "Just Because."  I don't know about you, but I think a card for no particular reason at all is just about the most fun to make.  It doesn't need a holiday or a special occasion or a celebration of any kind.  You make it and send it, well, just because you want to.

My particular card started with a little 'art' piece I made quite some time ago as a 'try-it' at one of our local art supply shops.  We were sampling Transfer Artist Paper, otherwise known as "TAP."  For those of you not familiar with it, TAP is a specially designed polymer coated paper which can accept inkjet printer inks (not laser) and almost any art materials you can think of.  Once the artwork is finished, it can be heat fused into most absorbent surfaces or transferred onto non-absorbent surfaces.  It's really a very cool medium that you can learn much more about at C&T Publishing.  Lesley Riley is one of the inventors of TAP, and she has a book available with all the instructions and loads of ideas.

Best get back to my card.  I laid down a background with several art markers.  It's been awhile so I don't remember all of them, but I know some were Copics.  I then stamped the cute little image.  I think we were using Memento ink, but don't quote me on that.  The design was then heat fused into a piece of watercolor art paper, a nice thick weight.


When I decided to use the piece for this card, I trimmed it down to fit an A2 sized base.  Then all I needed was a sentiment and a few pearls to coordinate with the marker colors I used.  I created the sentiment myself, and printed it on a coordinating piece of card.  I cut the pieces banner-style and affixed them with foam tape.


Since I had decided to use a black card base, I needed a light-colored insert for the message and signature.  So when I created the inside sentiment, I printed it on the same card as the outside bits.


It's really a rather CAS style, don't you think?  I'm quite please with the way it turned out.


There aren't too many additional details.  The card base and the pearls are from Recollections.  Sorry I can't tell you more about that cute stamp, but it belonged to the shop and I didn't get the name.  I actually do remember asking at the time, but I left the shop and promptly forgot.  (What can I say?  It was at least two years ago!!)  I hope you'll forgive my forgetfulness, and come back to visit again soon.  Until then, Happy Crafting!!


Big HUGS,
CHRISTINE

Sunday, June 9, 2013

Stars and Stripes

Yes, it is crazy, isn't it?  Two days in a row!  Just don't get used to it; I'm really not that prolific.  But I do have a card for you to bring in the new theme at the Card A Day Blog.  With Independence Day in the USA right around the corner, we are beginning our inspiration for 'Country's Birthday.'  My card does, indeed, celebrate the birth of the United States, and was a snap to put together.  A scrap of blue, a few strips of Washi Tape and a stamp with some ink, all added to a base, that's it.  Simple, Fun, Striking and Patriotic!


Oops, I forgot to mention the bling, which looks a little dull in the pics (sorry), but really does look nice in person.  The card started with a bright white A2 sized base.  The flared stripes are just three torn pieces of washi, and the stars were cut on my Cricut from a scrap of blue card.


I think you can see in this photo that the blue stars were affixed with foam tape.  Doing that and using the red blingy stars (Mark Richards Crystal Stickers) give a little dimension to the card.  The sentiment, from Pink By Design, was stamped with Versamark Black Onyx ink.


Didn't I tell you it was a quick one!?!  And just because it was so quick, I have another really fast card to show you.  This one harkens back to a card I made just about a year ago which you can see here.  I had saved the cut-out pieces to use them 'some day.'  Well, this was the day.  The leftover cuts simply needed a base, a couple of stars and a sentiment.  Here are the pics:


These two cards are great for Flag Day (June 14), Independence Day July 4) and Operation Write Home.   I hope I've given you a little inspiration for your country's birthday, whenever it is.

That's it for me today.  See you again very soon, I hope!!

Big HUGS!
CHRISTINE

Saturday, June 8, 2013

Hi!

Hey there, folks!  Well, I don't usually do more than one post during a given theme for the Card A Day Blog, but this week is an exception.  I have a second inspiration for you during this 'friendship' week that I hope you will enjoy.  Once again, except for the card base, all my pieces were leftovers/scraps.  Even my central image, a wonderful digital design by Guy Gondron for an internet class I took awhile back on coloring with Copics, was a leftover image just waiting for the right project.  So, since I have used a digi design on this card, I am entering it into the Seasonal Fun Challenge (must use a digital design) at CDAC.  I haven't mentioned this before, but I've been having a real issue with arthritis in my right hand so that I am scarcely able to write, let alone color, for any extended time.  Fortunately, I had colored this image at the time of the class, and here is my card!


When I was browsing through a collection of images I had previously printed out (or even colored), I came upon this cute turtle.  I couldn't help thinking first, how cute he looks peering up at that little ladybug flying by his head, and second, how much he reminded me of a turtle my hubby encountered in our yard one day and brought into the house for us to see.  Of course, we immediately named him;  Bartholomew T. Turtle.  I decided to use a kraft card base to mimic sand, and put Bartholomew in a little grassy area right by the sand.  For the grass I used two different dies (One from Impression-Obsession and the other, I think, from Lifestyle Crafts) to cut my green scraps.  Here is a close shot of the coloring and the grass:


Since I didn't want Bartholomew to look lonely on the card, I decided to put a nice frame around him.  I actually used a test cut that I had saved from an earlier project.  When choosing the colors for the frame, I wanted to highlight the color of the little ladybug.  I used Tim Holtz Distress Inks in "Spiced Marmalade" and "Ripe Persimmon" to add the color to the frame.  Also, I wanted to have some dimension on the card, so I layered the grasses and the frame with foam tape.  Here is an angled pic for you which shows the dimension:


Finally, I stamped the simple greeting, and left the inside blank so there is lots of room to write a nice message to a favorite friend.  The stamp came from a set called "Happy Messages" by Stampendous, and was stamped with Versamark "Onyx Black."

If you have some friends you haven't seen or spoken with for awhile, why not put together a few cute cards and write them a 'happy message?'  Everyone loves to open their mailbox to find a lovely greeting card waiting to be enjoyed.

Thanks so much for stopping by today.  I hope you're enjoying a wonderful weekend!!

Big HUGS!
CHRISTINE

Monday, June 3, 2013

my friend

That's YOU, I hope!  So happy you decided to come for a visit today.  We had a pretty scary time of it this weekend with some nasty storms.  There were tornadoes in the area which did a fair amount of damage, but luckily no deaths or major injuries.  Certainly nothing like what the poor folks in Oklahoma have seen.  Lots of prayers going out to them.

On a happier note, I do have a card to show you today.  We're having 'friendship' week over at the Card A Day Blog.  I think a cheery card for a friend is one of the easiest cards to create.  Just put together a few elements that please you, and you're done!  That's pretty much what I did with my card.


I happened to have a few pieces left over from when my sister was visiting.  I thought it would be easier to use them for a card rather than put them away.  That sound too much like 'cleaning.'  I decided on a banner style, and started playing.


My base card is a piece of kraft cs that was left from an earlier project.  The blue mat was left from my sister's playtime, as were the three pieces used for the flags.  I used a border punch for the 'valance', then added a thin strip for trim and a few pearls for extra prettiness.  Last step was to add the cute little sentiment.


As you can see, I brought the colors to the inside with just a few thin strips of the design papers, using them in the same order as on the front, and then stamped the greeting.
 
This was actually one of my quicker cards to make, from idea to completed project.  I usually fuss for much too long a time before I manage to get started let alone get finished.  ;)   I'm also entering this card in the CDAC Anything Goes Challenge.
 
Here is your peek at the full front of the card.  I hope you can see the sparkle in the center flag.


The details are short and sweet:

          Papers:  KandCo and Recollections
          Pearls:  Recollections
          Punch:  Creative Memories
          Ink:  Versamark black onyx
          Stamps:  Stampendous 'Happy Messages' set SSC109

Thank you so much for your visit.  I'll be back with you in a few days.  In the meantime, I hope everyone has some nice calm weather and lots of wonderful moments!

Big HUGS,
CHRISTINE