Followers

Sunday, August 26, 2012

A Little Faith

Happy Sunday, everyone!!  I do hope you're having a beautiful day, and I thank you for spending a bit of it with me.  I have another CADB design for you, and I'm so happy to have Sunday for this week's theme, which just happens to be 'With Faith.'  While there are many kinds of faith, I decided to work within a religious meaning.  I've been wanting to make more use of my Cricut and the many cartridges that I have, and I knew I had a cartridge with appropriate images for a 'faith' card.  So I went to my cart stash and pulled it out.

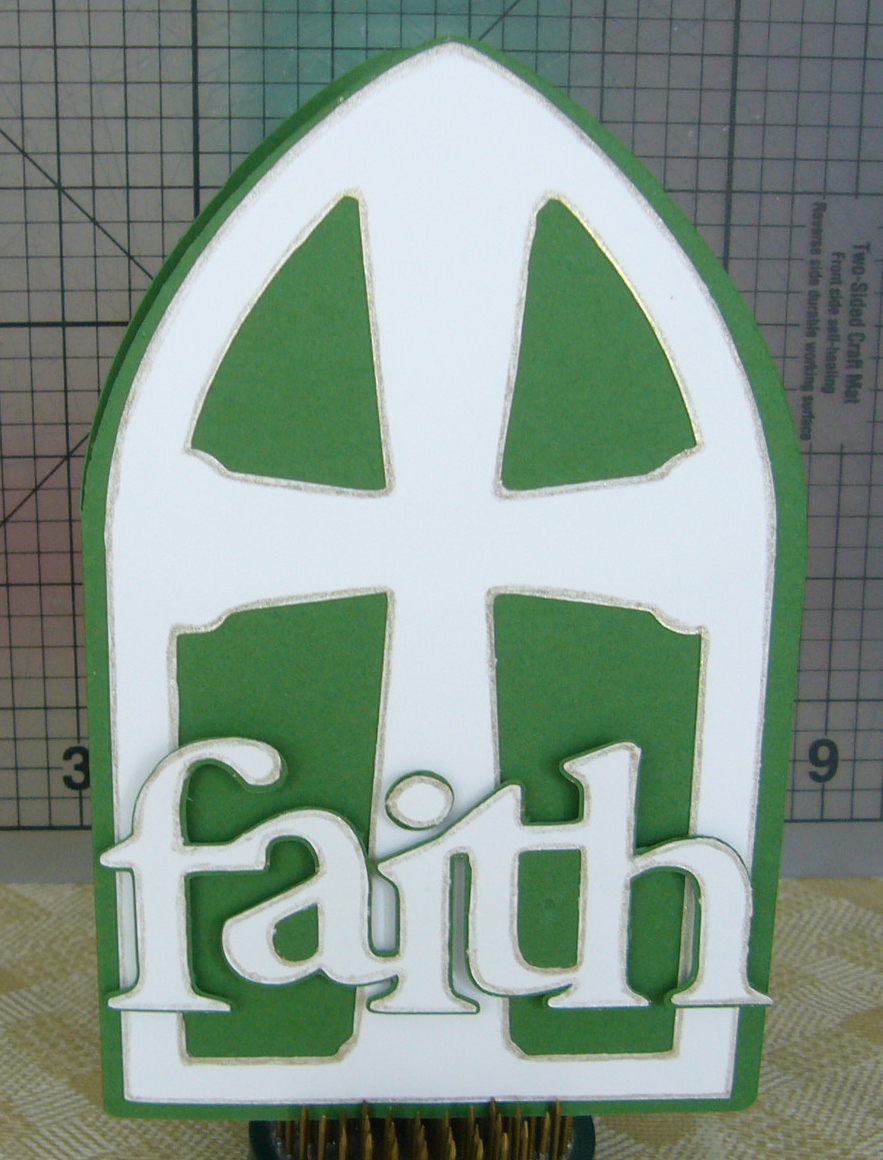
The card I made is really clean and simple.  Using the Cricut Craft Room software made designing my card really easy.  (Disclaimer:  no affiliation, not receiving payment or product for comments)  Once I had the design ready, the rest was simply a matter of choosing paper, cutting and assembling.


I chose the main image that I wanted, then created the card cutout using the shadow of the main image.  I chose the word 'faith' with its shadow and mounted it using foam tape.  I cut a matching white layer for the inside of the card so I could stamp a sentiment and have a nice space for a signature and personal message, if desired.


For just a tiny bit of glimmer (which is extremely hard to see in the photos) I used a glitter pen to outline all the white shapes.
 
 
This card fits into a 4" x 6" envelope.  Yes, I know, not my usual A2.  Crazy isn't it?  I jumped WAY out of my comfort zone on this one!!     heehee


Here are the very brief details:
          Cricut Cartdridge:  Inspired Heart (Cut on Cricut Expression 2)
          Papers:  Stampin' Up 'Whisper White' and 'Garden Green'
          Stamp:  Stampin' Up 'Thoughts and Prayers' set
          Ink:  Ancient Page 'Pine' dye inkpad
          Glitter Pen:  Sakura Gelly Roll 'Clear Star'
 
See you again soon.  In the meantime remember to always keep your creative genius happy and well fed!!!
 
CHRISTINE


Friday, August 17, 2012

One of My Favorite Cards

Hello, out there!  I have another card for you today which is posted in the Card A Day Blog for this weeks' theme, "Cheer Up."  This is certainly one of, if not my most favorite card that I've made.  I actually made it some time ago, but never got around to posting it for you.  It really is a quick and easy card to put together.  Probably the most time-consuming part of the card, aside from choosing the design paper, is the coloring.  And even THAT is done quickly once you have the colors chosen.

I made this card while at visiting my DS (sister, that is), and, since I was using many of her supplies, have no record of most of what I used.  I did start out with a standard A2 sized card base (4 1/4" x 5 1/2") in a lovely linen textured card stock.  I spotted a beautiful piece in DS's scrap box that I thought would make the perfect backdrop for my pretty lady stamp.  Then, all I needed was a sentiment.


The colors to use for the stamp were easily chosen to match the colors in the floral background paper.  The image was stamped on a nice smooth white piece of card, colored with Copics, and the white was toned down by gently inking around the image leaving a plain white border.  That piece was then matted to a piece of blue card cut just a bit larger.  The pearls were added for an extra touch of class.  Memory fails as to whether the pearls just happened to be the right color or I used the same blue Copic marker as in the image, but I think it was the former.


The sentiment was stamped in black on the same blue card as the mat, and then die cut and inked lightly with the blue as used on the lady piece.


And here are the two stamped pieces together:


As you can see, the dp is cut on the diagonal to cover just half of the card front, leaving a tiny white border at the top and left side.  The card was given some dimension by mounting the lady to the card with foam squares and the sentiment with a thinner foam tape.


Who knows, perhaps I will allow myself to use this card one day.....................

The image stamp is from Sweet Stamps; 1900's Lady, #513F.

Hope this card was able to cheer you.  Do remember to keep your creative genius happy and well-fed!

Hugs to all!
CHRISTINE

Wednesday, August 8, 2012

Thinking of You

Greetings to all!  I hope you're having a wonderful day.  I've just returned from a lovely long weekend with my dear sister in Chicago, and the card I have for you today was made entirely from her materials  I did bring a few things of my own on the trip, but ended up not using them.

This card is for the Card A Day Blog, where our theme for the week is 'Embossing.'  I had brought several embossing folders and a few stamps to use for my card, but my sis pulled out some nice vellum.  So, I decided to do some hand embossing with a little paper piercing on the vellum since I haven't used those techniques in quite some time.  After doing a little test piece, I determined that my card would have a clean and simple look to showcase the hand embossing.


I used metal stencils from my sister's stash; one for the corner and one for the three center florals.  The left and top edges were also embossed and pierced using a stencil from Ecstasy Crafts.

The card base is a nice smooth white, cut to 4 1/4"x 5 1/2".  The mat is a glossy yellow cut just a bit smaller as I wanted only a tiny bit of the white edge showing.  And the vellum is affixed with white brads in three corners.  For a little variation I rounded just the lower right corner of all three layers.


Staying with the CAS idea, I stamped the greeting directly on the vellum and used white embossing powder to match the hand embossing.

This card definitely is versatile enough to use for many occasions.  I hope you'll click on the photos to get the best views.


This is really quite an easy card to make if you like to hand emboss.  That part does take some time, and, if you've never done it before, maybe a little practice.

The small print:
          Paper:  Best Occasions from Walmart Glossy Yellow,  Card base Neenah 'Solar White'
          Stamp:  Hero Arts 'Sweer Threads Labels'
          Stencils:  Ecstasy Crafts #PS123, (sorry, but I don't have names for the corner or floral)
          Ink:  Versamark
          Embossing Powder:  Stampendous 'Detail White'
Hope you'll come back to visit often, and remember to always keep your creative genius happy and well-fed!!

CHRISTINE

Thursday, August 2, 2012

A Real Cut-Up

Hi everyone!  Wow, I can't believe we're already into the month of August.  This year is going by so very fast that I can hardly keep up............. 

My card today is for the Card A Day Blog theme of Using Die Cuts.  I had a certain design in mind, but then I remembered I hadn't made a card, yet, for a special little girl in my family whose birthday party is in two days.  So, I decided to combine the two projects and save a little time.  Since we were using die cuts, I thought I'd delve into my Cricut carts and see what I could come up with.  I started exploring one of the carts that was included in the purchase of the Expression 2 when it was released for the Cricut Anniversary.  I was hoping to make a card using nothing BUT die cuts, and I nearly succeeded.  The cartridge I used is called 'Just a Note' and includes a card feature.  I was able to find the perfect card for our little birthday girl.


This tri-fold card turned out to be just what I needed.  We will be celebrating a first birthday, and the cake, appropriately, has one candle.  I really didn't have to do much besides setting the sizes for the cuts and choosing the papers.  I knew I would be using pink, so I had no problem making choices for the layers with coordinating papers from my stash.  I also happened to have some coordinating stickers which I was able to use for a little embellishment along with some tiny punched hearts and a little bling to accent the letters on the front.

Here are two more pics to show the different parts of the card more clearly:


The picture just above is the inside of the card.  I wanted to hide 'lst' or '#1' under the cake, and I happened to have a number one sticker that I paired with the little flower standing in for the # sign.

Here is your final pic which shows the card before the two sides are opened:


I hope you've enjoyed your visit today.  Don't be shy about leaving a comment; I love to read them.  And I'll be sure to answer any questions promptly.

The nitty-gritty:
          Papers:  Recollections and K&Company
          Stickers:  K&Company Brenda Walton 'Small Wonders Girl'
          Punch:  Stampin' Up Owl (Yes, the tiny hearts)
          Gems:  Darice


REMEMBER,  always keep your creative genius happy and well-fed!

CHRISTINE