Hi everyone! Just want to give you a little advance notice about a cool blog hop I'm in this weekend. As a designer for the Card A Day Blog, I am participating in a hop celebrating World CardMaking Day which happens this year on October 1st. The hop includes 13 designers, and will run the whole weekend through midnight ET on Sunday night so you'll have plenty of time to check out all their blogs. There are lots of prizes involved both from the main blog as well as some of the designers' personal blogs. And we are having a challenge! You'll have to visit and play along to win!!
Our special hop will be featuring Christmas cards to help inspire you in your own holiday cardmaking for the upcoming season. Then the daily card inspirations will continue, starting Monday until just before Christmas, with various themes, including Christmas Around the World, Children and Christmas and much more. Every month is a new challenge with more prizes!! So visit often!
Hope you'll save some time to pop in for the hop!!
Hugs!!
CHRISTINE
Friday, September 30, 2011
Tuesday, September 27, 2011
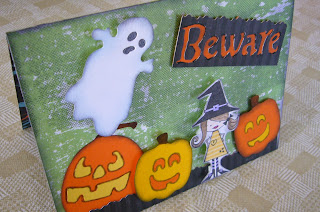
Best Witches.....
It's 'Halloween' week at the Card A Day Blog, and I decided I wanted to try cute rather than scary. If you're new here from CADB, welcome. I'm glad to have you here for a visit, and hope you'll decide to become a follower.
As I was foraging through my Halloween goodies to come up with an idea for my card, I happened upon some Sizzix dies that I had forgotten about. I had been considering a newish stamp set that I had, and thought the combination would make for a fun card. It all started with a certain cute little Halloween witch.................

I stamped her on white cardstock, colored her with markers and paper-pieced her dress. I die-cut the ghost, and then backed his head with a shimmery scrap to highlight the eyes and mouth. Then I inked him with some blue and gray for dimension. I die-cut the word 'Beware' from a piece of gray and black patterned paper, but instead of using the letters, I used the negative and backed it with some orange that I had darkened a bit with gray ink.
Next I went to work on the jack-o-lanterns. I had two different dies, so I cut them both twice, and reversed the colors for the eyes and mouths. I colored the stems, and inked around the eyes, mouths and outer edges.
The card base is a two-sided patterned paper. I liked the green for the outside of the card, but it was a bit bright. I used gray ink on a cloud background stamp to darken the green a little. You really can't see the clouds, but it provides the needed effect. I used a torn paper mask so as not to stamp the lower part of the card. Then I added a dark bottom border using more of the gray/black striped paper.
Most of the elements were mounted with dimensionals. You can see all the layering in the next photo.

The reverse side of the card stock is sort of a wild flame pattern. It's in the wrong orientation for fire, and I thought I would insert a liner. Flipping the card open, I decided it would be a fun surprise to leave it as it was, and just added a sentiment and a spot for a signature which carried over the colors from the outside.

Here's a closer shot of the sentiment!

I had so much fun putting this card together. Hope you like it!!
Here's the recipe:
Stamps: Unity Bella Blvd 'Best Witches'; Impression-Obsession 'Clouds'
Dies: Sizzix Brenda Pinnick Pumpkin Face, Ghost, Jack-O-Lantern #2
Inks: Stampin' Up Basic Gray and Bashful Blue; Versafine Onyx Black
Markers: Copic; Tombow
Cardstock: Glitz Design Hallow Flames; Generations Stackers; Recollections; Stampin' Up
Scissors: Fiskars Paper Edgers
I hope you have a sec to leave a comment........I'm really glad you stopped by today!
And remember: keep your creative genius flowing.........
CHRISTINE
As I was foraging through my Halloween goodies to come up with an idea for my card, I happened upon some Sizzix dies that I had forgotten about. I had been considering a newish stamp set that I had, and thought the combination would make for a fun card. It all started with a certain cute little Halloween witch.................

I stamped her on white cardstock, colored her with markers and paper-pieced her dress. I die-cut the ghost, and then backed his head with a shimmery scrap to highlight the eyes and mouth. Then I inked him with some blue and gray for dimension. I die-cut the word 'Beware' from a piece of gray and black patterned paper, but instead of using the letters, I used the negative and backed it with some orange that I had darkened a bit with gray ink.
Next I went to work on the jack-o-lanterns. I had two different dies, so I cut them both twice, and reversed the colors for the eyes and mouths. I colored the stems, and inked around the eyes, mouths and outer edges.
The card base is a two-sided patterned paper. I liked the green for the outside of the card, but it was a bit bright. I used gray ink on a cloud background stamp to darken the green a little. You really can't see the clouds, but it provides the needed effect. I used a torn paper mask so as not to stamp the lower part of the card. Then I added a dark bottom border using more of the gray/black striped paper.
Most of the elements were mounted with dimensionals. You can see all the layering in the next photo.

The reverse side of the card stock is sort of a wild flame pattern. It's in the wrong orientation for fire, and I thought I would insert a liner. Flipping the card open, I decided it would be a fun surprise to leave it as it was, and just added a sentiment and a spot for a signature which carried over the colors from the outside.

Here's a closer shot of the sentiment!

I had so much fun putting this card together. Hope you like it!!

Here's the recipe:
Stamps: Unity Bella Blvd 'Best Witches'; Impression-Obsession 'Clouds'
Dies: Sizzix Brenda Pinnick Pumpkin Face, Ghost, Jack-O-Lantern #2
Inks: Stampin' Up Basic Gray and Bashful Blue; Versafine Onyx Black
Markers: Copic; Tombow
Cardstock: Glitz Design Hallow Flames; Generations Stackers; Recollections; Stampin' Up
Scissors: Fiskars Paper Edgers
I hope you have a sec to leave a comment........I'm really glad you stopped by today!
And remember: keep your creative genius flowing.........
CHRISTINE
Sunday, September 18, 2011
Cats and Bats and Spiders, OH MY! ! !
I think Halloween really might be my favorite holiday for making cards. It's just so much fun to pull out all the spooky and creepy and scary elements that we can use for this wild and crazy holiday. Today's card is another design for the Card A Day Blog theme week, 'Cats and Bats.' This post is somewhat photo packed so you can get up close and personal with all the details and angles.
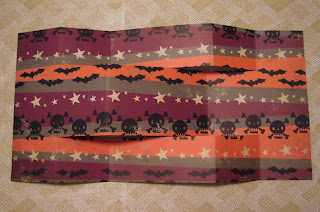
The base for today's card is a leftover piece of a 12x12 Halloween-themed heavier-weight design paper I used last year. You can see the card, which used the reverse side of the paper, here . Unfortunately, I neglected to note down the source of the paper. As in that card, I decided to make this one a tri-fold shutter, it gives so many surfaces and hiding places for design elements. The 6x12 base is scored at 2", 4", 8" and 10" and cuts are made the length of the piece at 1 5/8" from each edge and between the 2" and 10" score lines. The spacing of the cuts can be changed as desired. Here is a photo of the back of the card which will give you a good idea of what your piece should look like when scored, cut and folded. The card finishes at 4"x6".
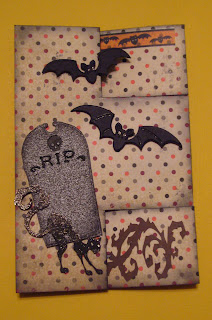
With the base prepared, I started planning all the elements. Of course, I knew the theme I was following, so that gave me my start. I decided to feature the 'stars' of the theme, the bats and cat, on the front. They needed a 'setting' so I added the gravestone. You're going to love this: the gravestone was cut from an old envelope. I thought the inside of the envelope was great for a look of granite.


I love the look of the 'blood-drip' letters in the warning sign. And, of course there must be a spider creeping along in the fallen branches.


The spider needs a sparkly web. And it just wouldn't be right to leave out the jack-o-lantern or the skull and crossbones. I also added a little extra sparkle here and there which doesn't show up well in the photos.


I hope you've enjoyed my bit of Halloween fun with cats and bats. Here's the main recipe, followed by a few last photos.
RECIPE:
Dies: CRICUT October 31 Cartridge; Cuttlebug 'Creepy', 'Beware', 'RIP'
Papers: Recollections
Stickers: Jolee's boutique, K&Company Layered Accents 'Spooktacular'
Rub-Ons: K&Company
Rhinestones: Studio 18
Ink: Stampin' Up Basic Gray
Glitter Pens: Copic Spica Black, Gelly Roll Clear Star
Dimensional: 3L Black 3D Foam Squares


I hope you have a moment to leave some love. See you again soon!!
Be sure to keep your creative genius flowing.........
CHRISTINE
Thursday, September 15, 2011
THANKFUL
Hello, lovely blog family. I'm here today to bring you another Card A Day Blog inspiration. Our theme, this week, is 'Giving Thanks.' With Canada's Thanksgiving holiday right around the corner, and our US Thanksgiving not far behind, it seems an appropriate time just now to be making those cards.
I've been wanting to make a 'banner' card for awhile, so I decided to try it for this one. First, I'll show you a pic of my supplies. I gathered alot more than I ended up using, but sometimes doing it that way helps with the inspiration.

This ended up being another opportunity to make use of more of my scraps, especially since I took some time recently to sort them. I don't usually have too many because I do try to use them as I go along, but there always seem to be more than enough around to play with. The idea went through several changes before I settled on my final project. I initially thought to make a 9"x4" card with a particular background paper, then I changed papers, then I wanted to do a 6" square, and finally I figured out something that I really liked using my always-and-ever favorite standard A2 size, 4 1/4"x5 1/2".
I had hoped to be able to take pictures along the way, but I got so distracted as I worked that I forgot all about the camera. I'll definitely try to improve on that for future posts. Now, without further delay, I bring you my card, which I am dedicating to you, my followers, because I truly am thankful for you taking time out of your busy day to come and visit.

Here are a couple of close-up shots where you can see the details and layering.


And here's the recipe:
Paper: K and Company, Recollections, Generations Stackers
Dies: Spellbinders Nested Maple Leaves and Petite Scallop Circles
Die-namics Fish Tail Banner
Stamps: JustRite Times New Roman 60pt., Stampin Up Build a Blossom
Martha Stewart San Serif Typeface and Custom Stamp Setting Kit
Punch: Stampin' Up Build a Blossom
Ink: Memento Dye Ink in Rich Cocoa and Potter's Clay
Thanks so much for your visit today. I really enjoyed making this card for you; hope you like it!
Keep your creative genie-ous flowing.
CHRISTINE
Tuesday, September 6, 2011
Havin' a Hootin' Good Time............
A big welcome to those of you joining me from the new Card A Day Blog . I do hope you'll consider becoming a follower. If you're already a follower, and are not yet familiar with this fun, new inspirational blog, please stop on by. We have several wonderful designers, weekly themes, and challenges with prizes!!
I am having so much fun using OWLS on my cards this week. Every day, it seems, I'm thinking of different ways to use this versatile image, especially when I hear the owls hooting in the woods behind our house at night.
The card I have for you today has a slightly more atmospheric mood. I'm using it for Halloween, but it can easily be adapted with a different style of owl and different backgrounds and elements for most any kind of event.
I guess I've been in a 'krafty' mood this week -- paper, that is -- because that's how this card started. But the way I feel about it.....

My card base is the standard A2 (5 1/2" x 4 1/4") size. I stamped the background forest in Stampin' Up Basic Gray ink using a wonderful 6"x6" stamp, 'Branches,' from Impression Obsession's Cover-a-Card line. If you're not familiar with these stamps, do check them out. They have some really fabulous backgrounds (disclaimer here: no affiliation). I wanted a shadowy look, but not too dark. My big golden Autumn moon is cut from a lovely shimmery paper from Paper Temptress using a large Spellbinder's circle die.
I needed something for my owl to sit upon, but I wanted a change from the branch, so I put him on Martha Stewart's Spooky Fence punched from Recollections black card stock. The owl, itself, is from the Stampin' Up set, Dark and Dreary, and was stamped on white cardstock with Versamark ink and heat embossed with Zing black embossing powder. The sentiment comes from a Studio G mini set, and is stamped on the same gold shimmer paper used for the moon and also embossed with the black powder. It's matted on a bit of the punched fence for a little added detail. Both the owl and the sentiment are mounted with dimensionals.
The three little birds in the tree are actually part of the fence punchout. I felt I needed a bit of something on that part of the card, so I cut them off the fence, coated them with Glossy Accents and put them in the tree. For a finishing touch, I used glitter pens to add a spooky glow to the owl's eyes and some moonlight glimmer to the spider webs, the fence and the ground between the fenceposts. If you click on the photo, I think you'll get a better look at the detail and texture on the card.
Here is a photo showing you the supplies I used:

Just for a fun surprise, the inside of my card is stamped with the same background as the front. It reads, "So Have a Happy Whoooootin' Halloween."
I hope you've enjoyed your visit with me today. Feel free to leave some love, and tell me what you like (or don't) about today's card.
Do remember to always keep your creative juices flowing.........
CHRISTINE
Sunday, September 4, 2011
Owl Love You Always.........
I'm so happy to be bringing you my first card as a designer for the brand new Card A Day Blog which was just launched a few days ago. We'll be getting into a Christmas Card Blog Hop in October, but for the month of September we are offering weekly themes which we hope will give you lots of inspiration for your own cardmaking.
Our theme for this week is OWLS. It was quite a challenge to decide how I wanted to play with this idea, but I decided on a cute idea for an anniversary card. This idea works equally well anytime you want to share your love with someone. It's a fairly easy card to make, so you should have no problem adapting the idea for yourself.

I started with a Neenah kraft card base in standard A2 size (4 1/4" x 5 1/2"), and added a design paper mat. Sorry, I used a scrap and don't remember the source. The main face of the card can be made with any generic white or off-white card stock, mine is white. The owl stamp is from a mini set by Studio G, and was stamped with Versamark, then heat embossed using Sweet Stamps Fine Detail Copper embossing powder. I hand cut the owl, and set it aside to work on the other stamping.
The branch is from the set Birds of a Feather by taylored expressions. I colored it using Tombow and Stampin' Up markers, and, using the "huffing" method, I stamped the image. I had stamped a few samples before stamping on the actual card, and decided I liked the rustic look I got when I didn't color in the image too carefully. The word OWL is from the same mini set as the owl stamp. I stamped it using Stampin' Up Soft Suede ink on a die-cut circle and layered it onto a petite scalloped circle. I then inked the edges with Memories Direct red. The rest of the sentiment is from the same set as the tree branch and also stamped with the Soft Suede along with the inking on the card edge.
Finally, I stamped a few hearts from the Heart and Flower set from Martha Stewart in the same red mentioned earlier. I decided to give the owl a big heart, so I used the smaller of the two heart stamps and colored it in with another Stampin' Up marker because I wanted a brighter red. I gave it a coating of Stampendous clear embossing powder. The owl itself, as well as the word 'owl,' the owl's heart and one of the floating hearts are all applied with dimensionals. Here's a photo of most of the supplies I used:

I sure hope you've enjoyed today's project, and would love your comments. See you again soon!
Remember, keep your creative genius flowing.........
CHRISTINE
Subscribe to:
Posts (Atom)